
With the right lighting, you can express so many emotions in a photograph, as well as shed details on the object in the photograph. You can find dark lighting to show dark emotions and bright lighting to show bright emotions. In other words, the lighting in a photograph can be extremely expressive.
To be honest, there is one light that I cannot agree with when it comes to photography. What light is that? Artificial light. I refuse to use it. To me, photographs using natural light appear natural to the human eye. However, there are many downfalls when it comes to natural light photography. Natural light sources are rarely consistent and come with an incredible amount of variables that alter shapes, tones, and colors.
5 Natural Light Food Photography Tips
Here are five of my favorite natural lighting tips when it comes to food photography.
1. Define the photograph’s purpose.
What story are you trying to portray in your food photo? What type of food are you photographing? What mood do you want to set with the photo? You need to answer all of these questions in order to get the correct mindset when thinking about your photograph.
2. Find the light source.
Walk around your house and determine where you get the best light. Is it by a window? Do you have to get light by setting up your photography scene on your back porch? Will you receive the best light in a bedroom? Remember, photography is all about the light and you want the best light possible for your photographs.
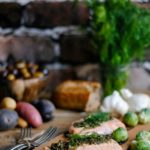
I used to live in a rowhouse that had very little natural light since it was north-facing and it backed up to an alley and other rowhouses. That’s city living for you. I had to make the most out of my situation. We had a car port off the back of the house and in the car port was a work bench. The car port received the perfect amount of sunlight at any point in the day. Plus, I loved the wood backdrop that the workbench provided, especially since I prefer rustic food photos.
3. Analyze the lighting situation.
What time of day is it? Are you receiving harsh light in your photography area? If so, do you want to soften the light using a diffuser? Or, will harsh light help enhance the details of the recipe? Many photographers don’t have the luxury of photographing food during the “Golden Hours” (e.g., early morning or evening when the sunlight is soft).
If you want to achieve a cold setting with your photos, go for harsh lighting to get strong shadows. You can also choose a dimly lit area to give your photo dark tones.
If you want to achieve a soft, gentle setting with your photos, choose a light and airy setting that has a lot of natural light that can be diffused. You’ll want to analyze the lighting situation in terms of what you want to achieve, as well as how much light you’re working with during a specific point in the day.
When the light is too harsh/strong, you might have to diffuse the light using a thin curtain or tissue paper. If the light is not bright enough and is casting too much darkness, you can bounce the light from positioning a white foam core board directly across from the light source to help bounce the light back onto the food.
4. Determine the angle.
Do you want the light to come in from the side, from the front, or from the back?
- Side lighting is when one side of the photograph is brightly lit leaving the other side darker. Side lighting helps add dimension.
- Back lighting means that you’re looking at the light source when looking through the viewfinder of your camera. This form of lighting can be the most difficult since it goes against everything that people usually say about photography … ever hear someone say, “Always have the sun behind you” when holding your camera? You can use this technique when photographing liquid surfaces since it will help accentuate the glossy look and feel of the recipe.
- Front lighting means that the light source is behind you when looking through the viewfinder of your camera. This type of lighting is the easiest to work with since you don’t need to worry about shadows and highlights.
My favorite lighting to use with food photography is side lighting. This type of lighting, in my opinion, adds so much depth, dimension, and detail.
5. Make the most of the situation.
That’s right. “I don’t have enough light” is never an excuse. Sorry for the tough love. If you can’t get enough light after you’re done preparing the dish, set aside a plate of food and photograph it the next day when you can access natural light. Do you receive very little to no natural light in your home? Go outside and explore your options. Are you too comfortable using artificial light? Please stop. Make natural light your best friend in photography by experimenting. As they say, practice makes perfect … and natural light will help you achieve perfection in photography, even if your photos are perfectly imperfect.
.


Great tips. Well written and well explained.
Thank you! I'm glad you found the tips helpful!